
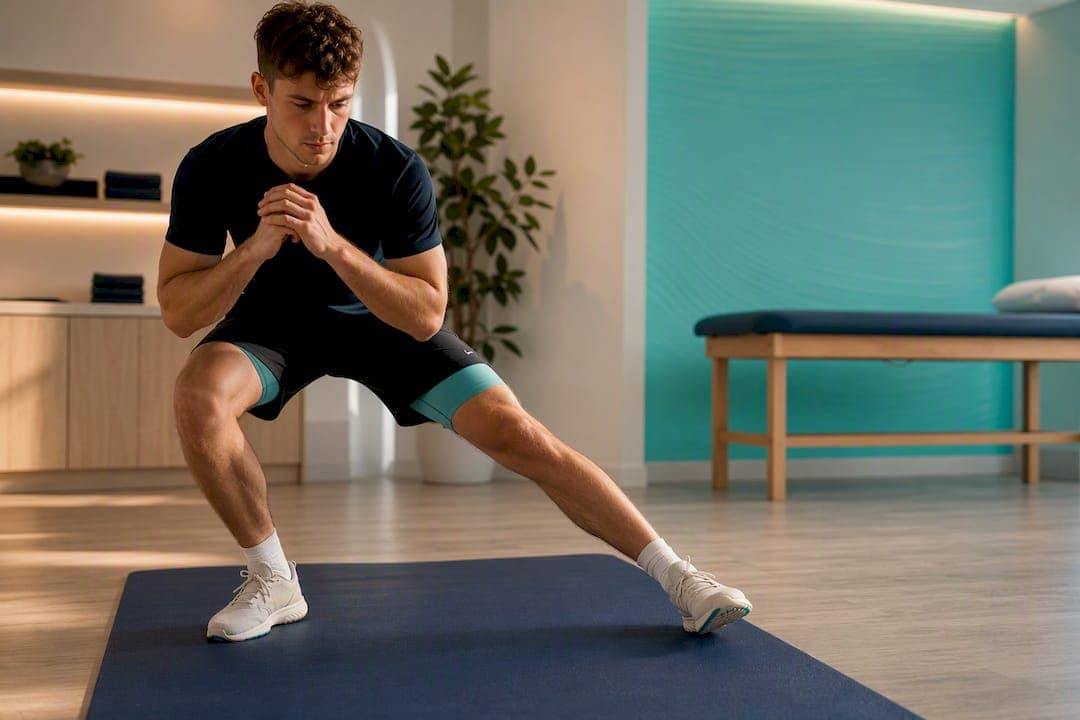
Start staged, criteria-based rehabilitation straight away: gentle, pain-free loading first, progressing only when you hit clear milestones, not a date on the calendar. Those milestones are clinically pain-free, then controlled sports training, then full team training. Mild to moderate strains typically become pain-free within about two weeks, while severe ones can take closer to eight.
TL;DR:
- Recovery time varies significantly with MRI grade, with grade I injuries healing in about two weeks and grade III taking up to eight weeks or longer.
- Early management relies on protection and controlled activity, specifically using POLICE protocols and isometric adductor holds to encourage healing without risking further injury.
- Progressive exercises should focus on restoring strength symmetry, controlling eccentric loads, and avoiding rushing to high-intensity activities before meeting objective milestones.
- Return-to-sport should be based on clinical pain-free status, functional testing, and symmetrical strength, with most cases requiring at least two weeks of controlled training before full participation.
- Prevention emphasizes preseason strength training, targeting eccentric adductor development and avoiding sudden training loads to reduce re-injury risk.
Table of Contents
- What is groin strain rehab and why does grading matter?
- How should you manage a groin strain in the first 48 hours?
- What are the best early-stage exercises for groin strain?
- What exercises help mid-stage groin muscle injury rehab?
- When can you safely return to sport after a groin injury?
- How can you prevent a groin strain from coming back?
- When should you see a clinician about a groin strain?
- The clinic's approach to groin strain rehab
- Ready to book a groin strain assessment in Dublin?
- Sources
What is groin strain rehab and why does grading matter?
Rehabilitation for groin strain, or adductor strain rehab as physios often call it, is not one plan for every injury. It is a graded process that depends entirely on how badly the muscle is damaged, and getting that grading right at the start saves you weeks of guesswork later.
A groin strain happens when the adductor muscles (the ones running down your inner thigh) get overloaded, usually during a sudden change of direction, an off-balance kick, or a hard sprint out of a standing start. Footballers, GAA players, hurlers, and sprinters see this constantly, because the mechanism is almost always eccentric: the muscle is lengthening under load at the exact moment it is asked to fire hardest.
Symptoms tell you roughly what you are dealing with before a clinician even lays hands on you. Sharp pain on kicking or sprinting, tenderness along the inner thigh near the pubic bone, and pain on resisted hip adduction all point to the adductors specifically, rather than a hip flexor or hernia issue. Swelling or bruising a day or two later usually means more fibre disruption than a strain that stays quiet.
Clinicians grade adductor strains I to III, and increasingly correlate this with MRI grading 0 to 3, which has become the more useful predictor of how long recovery for groin strain will actually take:
- Grade I (mild): Small number of fibres affected, minimal strength loss, usually walking normally within days.
- Grade II (moderate): Partial tear, noticeable strength deficit and pain on resisted testing, often several weeks of restricted training.
- Grade III (severe): Substantial tear or near-complete rupture, marked weakness, sometimes a palpable defect, and a rehab timeline measured in months rather than weeks.
That MRI grade matters more than most people realise. One prospective cohort study found athletes with MRI grade 0–2 injuries reached clinically pain-free status in a median of 13 days, while grade 3 injuries took a median of 55 days. That is roughly a four-fold difference in recovery time between what looks, on the surface, like "just a groin strain."
How should you manage a groin strain in the first 48 hours?
Follow POLICE, not RICE, in the first two to three days after injury. The old advice to rest completely until pain disappears is outdated and actually slows healing, because muscle tissue that sits unloaded for too long starts losing quality and strength almost immediately.
POLICE stands for Protection, Optimal Loading, Ice, Compression, and Elevation. The "optimal loading" part is the piece most people skip, and it is the piece that matters most. Rather than avoiding all movement, you introduce controlled, pain-free activity early, because structured rehabilitation with early loading is now the standard recommendation over prolonged inactivity.
Here is how to apply that in practice during the acute phase:
- Protect the area for the first 24 to 48 hours: avoid sprinting, kicking, or sudden direction changes, but keep walking normally if you can do so without limping.
- Load it gently and often. Short bouts of pain-free isometric adductor holds (more on those below) can usually begin within the first two to three days.
- Ice for 10 to 15 minutes every few hours in the first 48 hours if swelling or acute pain is present. Skip it if you have circulatory issues without checking with a clinician first.
- Compress lightly with a wrap or supportive shorts if it helps with comfort and swelling, but don't wrap so tight it restricts blood flow.
- Elevate when resting if there is visible swelling or bruising, though this matters less for groin injuries than for ankle or knee sprains.
Isometric adductor holds deserve special mention here, because they are one of the few genuinely evidence-supported early interventions. A gentle squeeze between the knees, held for 10 to 20 seconds and repeated several times, keeps the muscle engaged without the shearing forces of dynamic movement. Pain during exercise should stay at a mild, tolerable level (many physios use a rough "3 out of 10" ceiling) and should not linger or worsen afterwards.
Over-the-counter anti-inflammatories can help with early discomfort, but check with a pharmacist or GP if you're taking them for more than a few days, particularly around dosage limits and interactions with other medication.
Pro Tip: Don't judge your progress by how the groin feels standing still. Judge it by how it feels walking, then jogging, then cutting. Pain at rest disappears long before the muscle is actually ready to sprint.
What are the best early-stage exercises for groin strain?
The early stage of groin strain exercises has one job: calm things down, restore range of motion, and wake the adductors back up without provoking a flare. This typically runs from day two or three out to somewhere between one and three weeks, depending on grade.
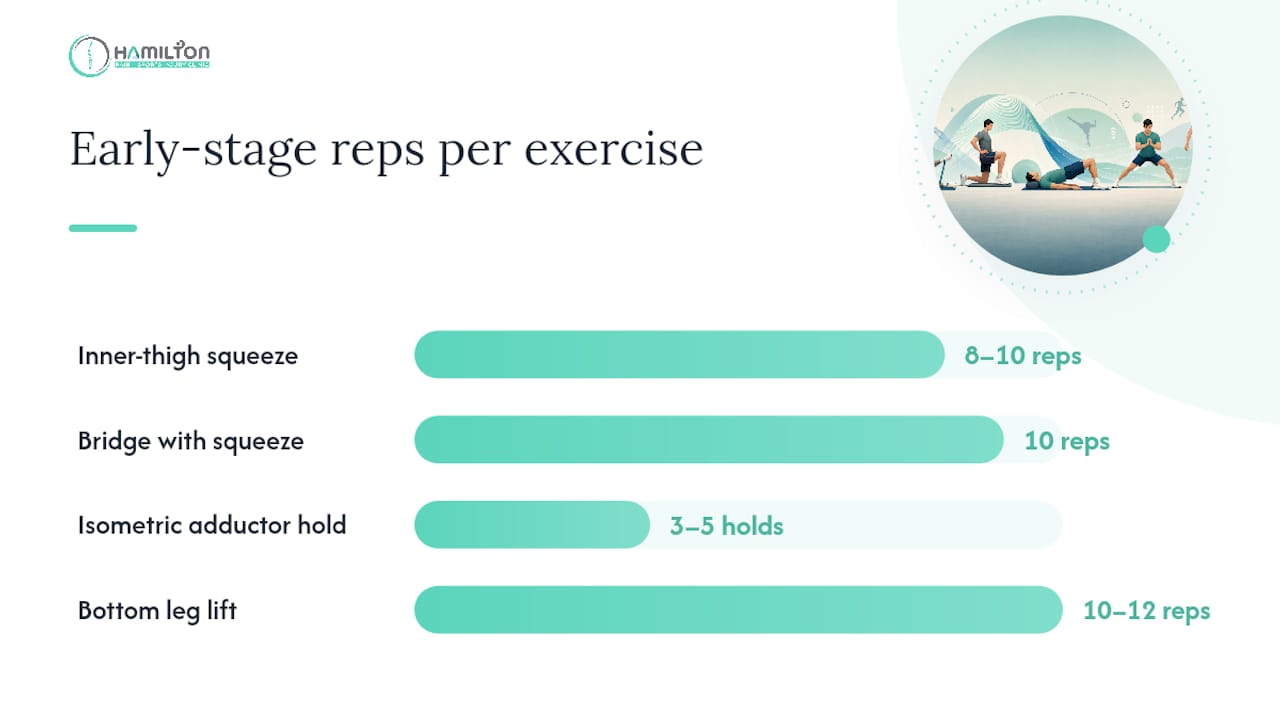
Four exercises form the backbone of this stage, drawn from the staged approach used in NHS adductor rehabilitation guidance:
- Inner-thigh squeeze (ball or cushion between knees): Lie on your back, knees bent, and squeeze a soft ball for 10 to 15 seconds. Aim for 3 sets of 8 to 10 repetitions, once or twice daily.
- Bridge with squeeze: Add the same ball squeeze while lifting your hips into a glute bridge. This combines adductor activation with basic posterior chain work, 3 sets of 10.
- Isometric adductor hold (long lever): Sit with legs extended and gently push your feet together against light resistance from a partner or a resistance band anchored between your ankles. Hold 10 to 15 seconds, 3 to 5 repetitions.
- Bottom leg lift (side-lying): Lying on your side, lift the underneath leg a few inches off the floor while the top leg stays bent and supported. This targets the adductors through a small range without much load. 2 to 3 sets of 10 to 12.
Keep pain during and after each session at a manageable level, never sharp or worsening the next day. That threshold, not a fixed number of days, is what tells you when to progress.
You'll know you're ready to move on when you can do all four exercises with no pain above that mild threshold, walk without a limp, and manage light jogging on a flat surface without provocation. The most common mistake at this stage is rushing straight to sprinting or kicking because walking feels fine. Walking uses a fraction of the force a sprint start does, so it's a poor test of readiness on its own.
Pro Tip: Keep a simple pain diary for the first two weeks, rating pain 0 to 10 immediately after exercise and again the next morning. If the next-morning number keeps creeping up, you're progressing too fast.
What exercises help mid-stage groin muscle injury rehab?
Middle-stage rehab shifts the target from "does it hurt" to "is it strong, symmetrical, and controlled under real load." This is where most groin strain rehab exercises graduate from isometrics into eccentric and multi-directional work, generally from around week two through six, depending on how the early stage went.
Three principles drive this stage. First, load goes up: resistance bands, added weight, and longer levers replace the light isometric holds. Second, eccentric work becomes central, because the adductors are almost always injured eccentrically, and strengthening them the same way they get hurt is what rebuilds resilience. Third, you start chasing symmetry between the injured and uninjured side rather than just "feeling better."
Five exercises typically anchor this stage:
- Adductor slide (sliding disc or towel on a smooth floor): Standing on one leg, slide the other leg out to the side and back, controlling the return phase slowly. This is a controlled eccentric load through the exact plane that caused the injury.
- Copenhagen adductor plank (progression, not day one): Side plank with the top leg supported on a bench, working the adductors isometrically and eccentrically under significant body-weight load. Start with the bent-knee version before progressing to straight-leg.
- Band-resisted lateral steps: A resistance band around the ankles, stepping laterally against tension, builds control through the frontal plane that sprinting and cutting demand.
- Single-leg squats: Building general lower-limb strength and control, with particular attention to whether the knee tracks straight or collapses inward.
- Split squats: Loading the hip and adductors through a longer range, useful for athletes returning to running-based sports.
Progress sets and reps gradually, and regress to an easier variation (bent-knee Copenhagen instead of straight leg, band tension reduced) whenever pain or form breaks down, rather than pushing through.
The squeeze test becomes genuinely useful here. A clinician applies resistance while you squeeze your knees together at a set angle, and pain-free strength during that test is one of the more reliable objective signals that you're ready to progress, rather than relying purely on how the groin feels day to day. Strength symmetry between legs, ideally within around 10 to 15% of your uninjured side, is another marker worth tracking if you have access to basic strength testing.
Adapt volume and intensity to your sport: a sprinter needs more straight-line eccentric loading, while a footballer or GAA player needs more multi-directional and kicking-pattern work layered in before progressing further.
When can you safely return to sport after a groin injury?
Late-stage rehab is where power, reactive strength, and sport-specific skill tolerance get rebuilt, and where the temptation to rush is strongest because everything finally feels normal again. Resist that temptation. This is the stage most reinjuries happen, precisely because athletes feel ready before they are actually ready.
The progression follows a clear sequence:
- Controlled plyometrics first: Bounding, low-level hopping, and controlled landing drills, introduced only once strength work is pain-free and symmetrical.
- Reactive change of direction next: Planned cutting and pivoting drills at moderate speed, building toward unplanned, reactive movement.
- Sport-specific drills: Kicking, sprinting at increasing intensity, and skill work relevant to your sport, integrated gradually rather than all at once.
- Full training integration: Rejoining team training in a limited capacity before progressing to unrestricted participation.
Return-to-sport decisions should follow objective criteria, not the calendar. The three milestones worth tracking are becoming clinically pain-free on functional testing, completing a full session of controlled sports training without symptoms, and then managing full team training without any flare. A prospective cohort study using exactly this criteria-based approach found it took a median of 13 days to reach pain-free status for grade 0–2 injuries and 55 days for grade 3, with the one-year reinjury rate sitting at 8% overall, and notably lower among athletes who genuinely met the pain-free milestone before progressing.
That reinjury figure is the argument for patience. Groin strains have a well-earned reputation for recurring, and the athletes who skip straight from "feels okay" to full training without passing through controlled sports training first are the ones who end up back at square one. If you want a fuller breakdown of testing benchmarks before returning to full competition, our return-to-sport after injury guide covers the testing sequence in more depth.
How can you prevent a groin strain from coming back?
Prevention is not complicated, but it is consistently skipped once an athlete feels recovered. Preseason adductor strengthening programmes have been shown to reduce injury incidence in athletic groups, which makes a strong case for treating adductor strength as a season-long habit rather than a post-injury chore.
A few concrete measures make the biggest difference:
- Build eccentric adductor strength preseason, not just after an injury. The Copenhagen plank and adductor slide work equally well as prevention tools.
- Target strength symmetry between legs. A side-to-side imbalance is one of the more consistent risk markers physios flag.
- Warm up with dynamic adductor work, not static stretching alone. Lateral lunges, leg swings, and light band work for a few minutes before training activate the muscle group properly.
- Manage training load deliberately. Sudden spikes in sprint volume or kicking sessions, especially early in a season, are a classic trigger for groin injuries.
- Cross-train while recovering to protect cardiovascular fitness without loading the adductors directly. Swimming and cycling are commonly recommended options once pain allows.
A structured mobility routine before and after training also helps keep the hips and adductors moving through their full range, which this mobility restoration checklist covers well for athletes building that habit into a weekly schedule. For a deeper look at balancing strength work across the whole lower limb, our guide on strength and injury prevention is worth reading alongside this one.
When should you see a clinician about a groin strain?
Most groin strains respond well to the staged approach above, but certain signs mean self-management should stop and professional assessment should start. Severe, sudden pain with an audible pop, a large or rapidly expanding bruise, or genuine inability to bear weight all warrant prompt review, since these can suggest a more significant tear or, rarely, a tendon avulsion.
The typical clinical pathway runs from GP or physiotherapy assessment through to sports medicine referral and imaging if the picture is unclear or progress stalls. Clinicians rely on the squeeze test, resisted strength testing, and palpation to build a clinical picture, and reserve MRI for cases where grading needs confirming or recovery isn't tracking as expected.
- Pain that hasn't improved at all after one to two weeks of appropriate loading.
- Visible deformity, a palpable gap in the muscle, or significant swelling.
- Numbness, groin lump, or symptoms suggesting a hernia rather than a muscle strain.
- Repeated strains in the same area within a single season.
Advanced treatments such as injections or, very rarely, surgery are reserved for cases that fail conservative management or involve a significant structural tear, and should only be considered once a clinician has properly assessed the injury. If you're unsure whether your symptoms warrant that step, our page on when to see a sports therapist sets out the clearer warning signs.
The clinic's approach to groin strain rehab
Every groin strain we see at Hamilton Pain and Sports Injury Clinic gets assessed the same structured way before a single exercise is prescribed: functional testing including the squeeze test, a baseline strength comparison between legs, and a clear look at training history and mechanism of injury. That assessment shapes an individualised loading plan from day one, rather than handing every athlete the same generic sheet of exercises.
What follows is staged progression, exactly as outlined above: early pain-free isometrics, middle-stage eccentric and multi-directional strength work, and late-stage sport-specific loading, all measured against objective strength symmetry rather than guesswork or a fixed number of weeks. Return-to-sport support means guiding an athlete through controlled training before full team sessions, not clearing them the moment pain settles.
If you're two or three weeks into self-managed rehab and progress has stalled, or the injury feels worse than a typical grade I strain, that's usually the point where a proper assessment saves far more time than it costs. Persistent pain, repeated strains, or uncertainty about which stage you're actually at are all good reasons to book one.
— Mark
Ready to book a groin strain assessment in Dublin?
Self-managed rehab works for plenty of mild strains, but it has one blind spot: you can't objectively test your own strength symmetry or run a proper squeeze test on yourself. That's the gap Sportsinjurydublin fills, with hands-on assessment and a staged plan built around your actual grading, not a generic exercise sheet pulled off the internet.
A first appointment at Hamilton Pain and Sports Injury Clinic starts with the same functional testing outlined above: squeeze test, strength comparison between legs, and a look at how the injury happened, followed by an individualised loading plan rather than a one-size-fits-all handout. From there, our Sports Rehabilitation Programme takes you through each stage with objective checkpoints, and if you're closer to the return-to-play end of recovery, the return-to-sport rehabilitation pathway is built specifically around the controlled-training-to-full-team-training milestones covered earlier in this piece. Where indicated, shockwave and laser therapy can support recovery in stubborn or chronic cases. If your groin strain isn't tracking the way this article suggests it should, book an assessment and get a plan built around your actual grading rather than a generic timeline.
Sources
For readers who want to go straight to the clinical sources behind this guide, the criteria-based rehabilitation cohort study is the strongest evidence base for the return-to-sport milestones described throughout. The StatPearls adductor strain overview is a solid clinical reference for grading and management principles, while the OUH adductor groin pain booklet and Berkshire Healthcare groin strain leaflet offer practical, patient-facing exercise staging. The NHS sprains and strains page covers general recovery and cross-training advice.
This article is general information, not a substitute for advice from a qualified doctor. Consult a qualified healthcare professional about your own circumstances before acting on anything here.
- Return to sport after criteria-based rehabilitation of acute adductor injuries: a prospective cohort study
- Adductor strain - StatPearls (NCBI Bookshelf)
- Adductor related groin pain — patient information booklet (OUH/NHS)
- Sprains and strains — NHS